How to Disable Bank Feeds in Quickbooks Desktop
3 proven Solutions for issues that stop you from deactivating online services of a bank account in QuickBooks
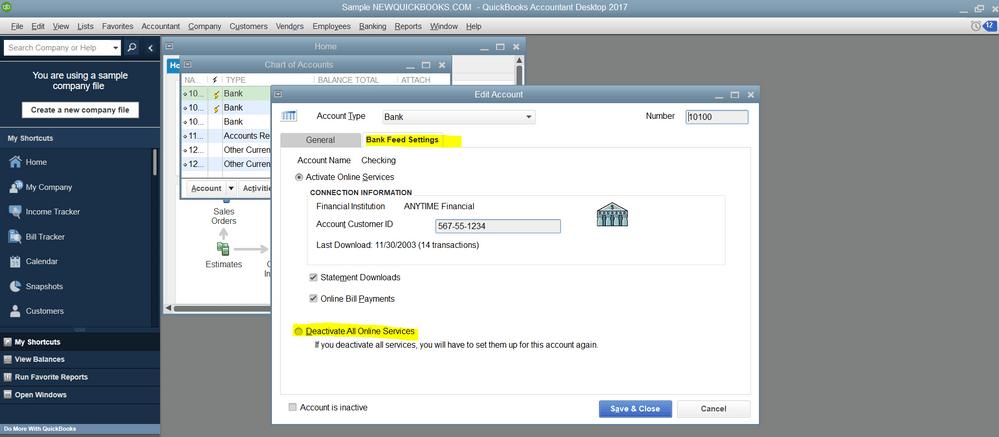
QuickBooks is an innovative yet easy-to-use accounting software. But sometimes, performing even some simple tasks may be challenging. In this article, we will discuss the issue of not being able to deactivate online services of a bank account in QuickBooks and its solutions. The Bank Feed setting button in this case remains available and the lightning bolt stays there in the Chart of Accounts when you try to deactivate bank feeds, which means the bank feeds for the account are still active.
You may also: How to Fix QuickBooks Desktop Overflow Error?
Steps to Resolve issues when deactivating bank feeds in QuickBooks
You can perform the following troubleshooting steps to fix issues faced while deactivating bank feeds in QuickBooks. Please create a backup of your company file before you proceed with the following steps.
Solution 1: Re-sort chart of accounts, items, or classes list
- Open the Lists menu and select one from Chart of Accounts, Items, and Classes.
- Click on the All-Names checkbox.
- Click Edit at the top left of QuickBooks.
- Select Re-sort Lists and then OK.
Step 1: Re-sort lists in QuickBooks desktop for Windows
- If you saved Chart of Accounts or items lists numerically, QuickBooks re-sorts them for you based on their first three digits.
- To arrange them in order, add 1 to 3-digit numbers before each item or account number.
- Go to the Lists menu and select the lists you need to re-sort.
- Click on the Include Inactive checkbox. (If the checkbox is grayed out, there are no inactive names)
- Open the View menu and select Re-sort Lists.
- Select OK and then Close and reopen your company file.
Step 2: Re-sort lists in QuickBooks for Mac
If you are using QuickBooks Desktop for Mac, you can perform the following steps to re-sort the lists.
Re-sort your customer list
- Go to the Customer Center.
- Click Edit at the top left and select Re-sort List.
- Select OK tab.
Re-sort your master names list
- Go to the Banking menu and select Write Checks.
- Take the pointer in the Pay to the Order Of field.
- Press cmd ⌘+L keys on the keyboard.
- Select the All-Names checkbox.
- Click on Edit at the top left of QuickBooks.
- Select Re-sort List and then OK.
Read Also: How to Fix QuickBooks Error Code 31600?
Solution 2: Verify and rebuild your company file
Bank feeds may not be getting deleted due to data damage. You should verify your data, check for the data issues, and use the rebuild tool to fix them. The following are the steps you can perform to verify and rebuild your company file in QuickBooks Desktop for Windows and Mac.
Step 1: Repair your company file using the Rebuild Data tool
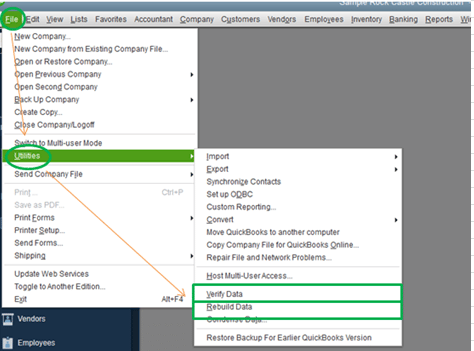
- Open the File menu, hover the pointer over Utilities, and select Rebuild Data.
- Select Ok on the QuickBooks Information window and follow the onscreen prompts to save a backup.
- Repairing your company may take a while. QuickBooks may seem stuck, but if you can move your mouse, the tool is doing its work.
- Select OK after the Rebuild Data Tool completes its task.
- Again, go to the File menu, hover over Utilities, and select Verify Data.
- Let the Rebuild Data Tool check your file for data issues.
If no issues are spotted, select OK and continue to use your company file.
In case QuickBooks finds an issue with your company file, choose Rebuild Now. If the data issues persist even after rebuilding your company file, try again. Contact our certified experts If the first rebuild took more than two hours.
Step 2: Use QuickBooks File Doctor to Repair your company file
If issues with data still exist, use the QuickBooks File Doctor for fixing your company file.
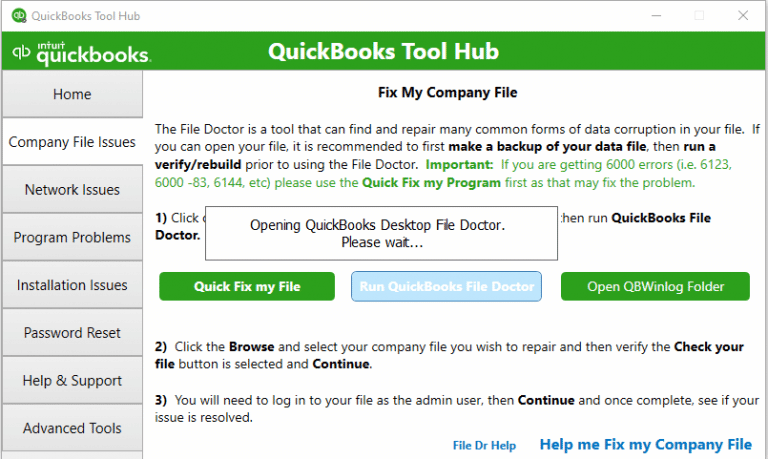
- Open tool hub and select Company File Issues.
- Select Run QuickBooks File Doctor.
- Click on the drop-down menu and select your company file.
- Click on Check your file and then Continue.
- Type in your QuickBooks administrator password and select Next.
Step 3: Repair your company file manually by rebuilding your data
Attempt to manually rebuild your company data only if you are confidant of what you are doing. In case you are not sure how to troubleshoot data error manually, we recommend you to reach out to a certified expert.
Solution 3: Deactivate online services using Microsoft Excel
Step 1: Export your Chart of Accounts
- Go to File menu
- Click on Utilities and then Export
- Select Chart of Accounts and click OK.
- Save the file on a location which is easily accessible.
- Next, open excel sheet and the *.IIF file in it.
- Find the old bank account
- Towards the end of the page, find !QBONLINE section where the bank accounts are showing.
- Change the Y to N for OLBANKING, OLBILLPAY, OLENABLED, OLTAB (online banking columns).
- Save the file.
Step 2: Import the MS excel file in the company file
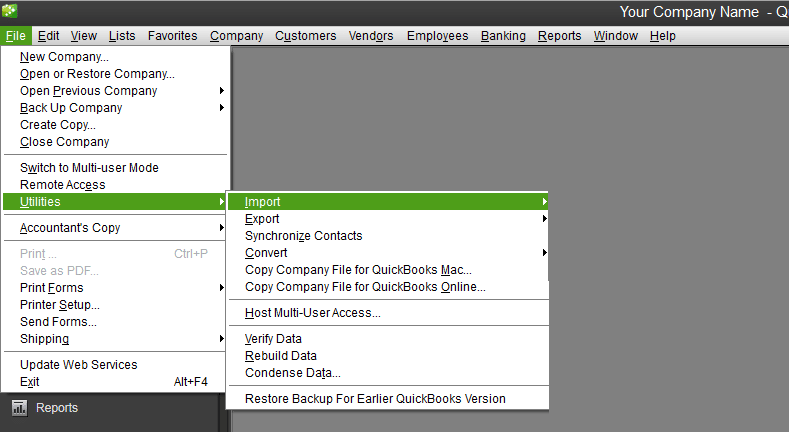
- Go to File menu
- Click in Utilities and then Import
- Select the *.IIF

- Check if the lightning bolt on the page is gone and try to set up Bank Feeds.
See Also: How to Fix Locked File Errors in QuickBooks Desktop?
Summing Up!
We hope that you are now able to deactivate bank feeds in QuickBooks desktop. If the issue persists or you have any other QuickBooks-related issues, you can contact our 24*7 QuickBooks support team at 1-800-761-1787. We are a hub of technocrats, who work round the clock to provide the best possible support services. So, do not hesitate in calling us anytime and seeking for assistance!
Interesting Reads
How to Fix QuickBooks Balance Sheet Out of Balance Error?
Steps to Install & Use QuickBooks Database Server Manager
How to Resolve QuickBooks Connection has been Lost Error?
Source: https://qbsenterprisesupport.com/deactivate-bank-feeds-to-fix-quickbooks-errors/
0 Response to "How to Disable Bank Feeds in Quickbooks Desktop"
Post a Comment